What is Amazon Route 53
A dependable and economical method of connecting end users to Internet applications
Sharing and then assigning numerous DNS resources to each Amazon Virtual Private Cloud (Amazon VPC) can be quite time-consuming if you are managing numerous accounts and Amazon VPC resources. You may have even gone so far as to create your own orchestration layers in order to distribute DNS configuration throughout your accounts and VPCs, but you frequently run into limitations with sharing and association.
Amazon Route 53 Resolver DNS firewall
With great pleasure, AWS now provide Amazon Route 53 Profiles, which enable you to centrally manage DNS for all accounts and VPCs in your company. Using Route 53 Profiles, you may apply a standard DNS configuration to several VPCs in the same AWS Region. This configuration includes Amazon Route 53 private hosted zone (PHZ) associations, Resolver forwarding rules, and Route 53 Resolver DNS Firewall rule groups. You can quickly and simply verify that all of your VPCs have the same DNS setup by using Profiles, saving you the trouble of managing different Route 53 resources. It is now as easy to manage DNS for several VPCs as it was for a single VPC.
Because Profiles and AWS Resource Access Manager (RAM) are naturally connected, you can exchange Profiles between accounts or with your AWS Organizations account. By enabling you to create and add pre-existing private hosted zones to your Profile, Profiles effortlessly interacts with Route 53 private hosted zones. This means that when the Profile is shared across accounts, your organizations will have access to the same settings. When accounts are initially provisioned, AWS CloudFormation enables you to utilize Profiles to define DNS settings for VPCs regularly. You may now more effectively manage DNS settings for your multi-account environments with today’s release.
Amazon Route 53 benefits
Automatic scaling and internationally distributed Domain Name System (DNS) servers ensure dependable user routing to your website
Amazon Route 53 uses globally dispersed Domain Name System (DNS) servers to provide dependable and effective end-user routing to your website. By dynamically adapting to changing workloads, automated scaling maximises efficiency and preserves a flawless user experience.
With simple visual traffic flow tools and domain name registration, set up your DNS routing in a matter of minutes
With simple visual traffic flow tools and a fast and easy domain name registration process, Amazon Route 53 simplifies DNS routing configuration. This makes it easier for consumers to manage and direct web traffic effectively by allowing them to modify their DNS settings in a matter of minutes.
To cut down on latency, increase application availability, and uphold compliance, modify your DNS routing policies
Users can customize DNS routing settings with Amazon Route 53 to meet unique requirements including assuring compliance, improving application availability, and lowering latency. With this customization, customers can optimize DNS configurations for resilience, performance, and legal compliance.
How it functions
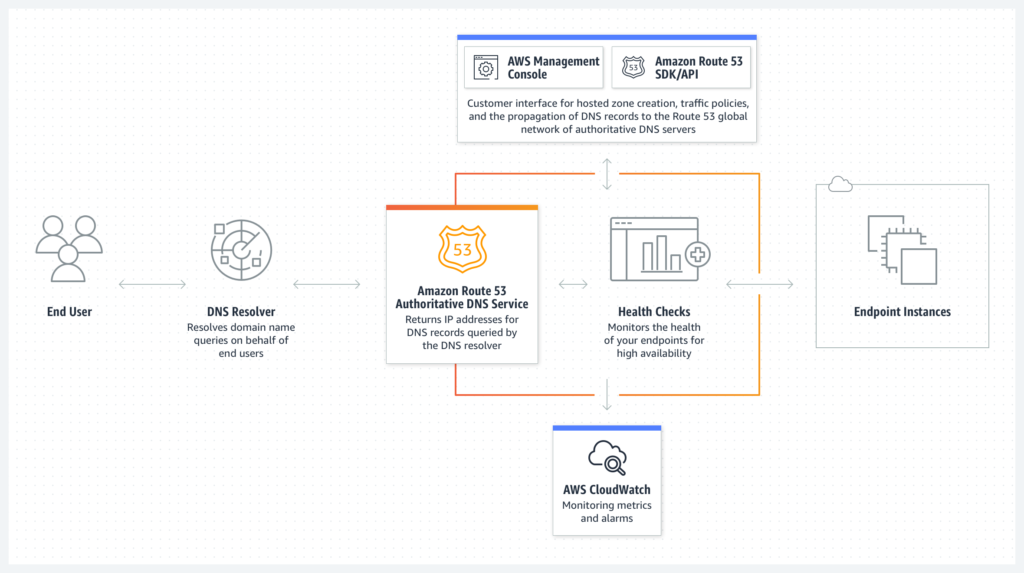
A DNS (Domain Name System) online service that is both scalable and highly available is Amazon Route 53. Route 53 links user queries to on-premises or AWS internet applications.

Use cases
Control network traffic worldwide
Easy-to-use global DNS features let you create, visualize, and scale complicated routing interactions between records and policies.
Construct programmes that are extremely available
In the event of a failure, configure routing policies to predetermine and automate responses, such as rerouting traffic to different Availability Zones or Regions.
Configure a private DNS
In your Amazon Virtual Private Cloud, you can assign and access custom domain names (VPC). Utilise internal AWS servers and resources to prevent DNS data from being visible to the general public.
Which actions can you perform in Amazon Route 53
The operation of Route 53 Profiles
You go to the AWS Management Console for Route 53 to begin using the Route 53 Profiles. There, you can establish Profiles, furnish them with resources, and link them to their respective VPCs. Then use AWS RAM to share the profile you made with another account.
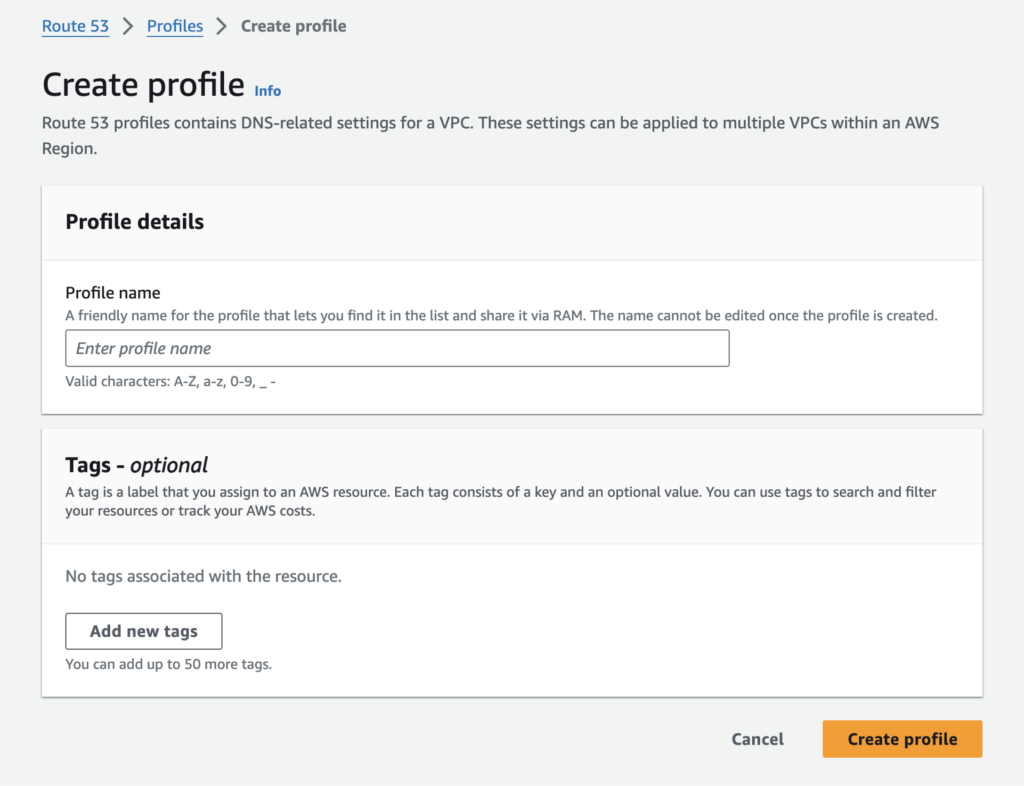
To set up my profile, you select Profiles from the Route 53 console’s navigation pane, and then you select Create profile.
You will optionally add tags to my Profile configuration and give it a pleasant name like MyFirstRoute53Profile.

The Profile console page allows me to add new Resolver rules, private hosted zones, and DNS Firewall rule groups to my account or modify the ones that are already there.
You select which VPCs to link to the Profile. In addition to configuring recursive DNSSEC validation the DNS Firewalls linked to my VPCs’ failure mode, you are also able to add tags. Additionally, you have the ability to decide which comes first when evaluating DNS: Profile DNS first, VPC DNS second, or VPC DNS first.
Up to 5,000 VPCs can be linked to a single Profile, and you can correlate one Profile with each VPC.
You can control VPC settings for different accounts in your organization by using profiles. Instead of setting them up per-VPC, you may disable reverse DNS rules for every VPC that the Profile is connected to. To make it simple for other services to resolve hostnames from IP addresses, the Route 53 Resolver automatically generates rules for reverse DNS lookups on my behalf. You can choose between failing open and failing closed when using DNS Firewall by going into the firewall’s settings. Additionally, you may indicate if you want to employ DNSSEC signing in Amazon Route 53 (or any other provider) in order to enable recursive DNSSEC validation for the VPCs linked to the Profile.
Assume you can link a Profile to a VPC. What occurs when a query precisely matches a PHZ or resolver rule that is linked to the VPC’s Profile as well as one that is related with the VPC directly? Which DNS settings, those from the local VPCs or the profiles, take priority? In the event that the Profile includes a PHZ for example.com and the VPC is linked to a PHZ for example.com, the VPC’s local DNS settings will be applied first. The most specific name prevails when a name query for a conflicting domain name is made (for instance, the VPC is linked to a PHZ with the name account1.infra.example.com, while the Profile has a PHZ for infra.example.com).
Using AWS RAM to share Route 53 Profiles between accounts
You can share the Profile you made in the previous part with my second account using AWS Resource Access Manager (RAM).
On the Profiles detail page, you select the Share profile option. Alternatively, you may access the AWS RAM console page and select Create resource share.
You give your resource share a name, and then you go to the Resources area and look for the “Route 53 Profiles.” You choose the Profile under the list of resources. You have the option to add tags. Next is what you select.
RAM controlled permissions are used by profiles, enabling me to assign distinct permissions to various resource types. The resources inside the Profile can only be changed by the Profile’s owner, the network administrator, by default. Only the contents of the Profile (in read-only mode) will be accessible to the recipients of the Profile, which are the VPC owners. The resource must have the required permissions attached to it in order for the Profile’s recipient to add PHZs or other resources to it. Any resources that the Profile owner adds to the shared resource cannot be edited or removed by recipients.
You choose to allow access to my second account by selecting Next, leaving the default settings.
You select Allow sharing with anyone on the following screen, type in the ID of my second account, and click Add. Next, You select that account ID under Selected Principals and click Next.
You select Create resource share on the Review and create page. The creation of the resource sharing is successful.
You, now navigate to the RAM console using your other account, which you share your profile with. You select the resource name you generated in the first account under the Resource sharing section of the navigation menu. You accept the offer by selecting Accept resource share.
And that’s it! now select the Profile that was shared with you on your Amazon Route 53Profiles page.
The private hosted zones, Resolver rules, and DNS Firewall rule groups of the shared profile are all accessible to you. You are able to link this Profile to the VPCs for this account. There are no resources that you can change or remove. As regional resources, profiles are not transferable between regions.

Amazon Route 53 availability
Using the AWS Management Console, Route 53 API, AWS CloudFormation, AWS Command Line Interface (AWS CLI), and AWS SDKs, you can quickly get started with Route 53 Profiles.
With the exception of Canada West (Calgary), the AWS GovCloud (US) Regions, and the Amazon Web Services China Regions, Route 53 Profiles will be accessible in every AWS Region.
Amazon Route 53 pricing
Please check the Route 53 price page for further information on the costs.


