ROG AND TUF GAMING’S BEST STREAMING GEAR AND SETUP
If you want to become a content creator or just broadcast your games online, live streaming is a great way to communicate with the gaming community. Simple to start. High-quality audio and video make your stream more engaging.
When you can’t identify what’s occurring on screen or if they sound like a robot in a well, watching someone play isn’t entertaining. If the stream is sluggish or crashes, ignore it. That’s why ROG and TUF Gaming provide a variety of streaming-ready gear to improve your content. From basic to extravagant, here’s everything you need and how to set it up.
TUF Gaming Capture Box-CU4K30
Three capture units with passthrough capabilities and different specs for your broadcast are available. The TUF Gaming Capture Box-CU4K30, their standard model in most territories, streams 4K at 30 FPS, 2K at 60 FPS, or Full HD at 120 FPS. The TUF Gaming Capture Box-FHD120, which streams Full HD at 120FPS without better resolution, is cheaper in some regions. Both provide 4K passthrough up to 60Hz, so even if you’re streaming at a lesser framerate, you can experience 4K60 on your monitor.
TUF gaming Capture Box-4K PRO
The TUF Gaming Capture Box-4KPRO supports HDR and VRR and streams 4K up to 60 FPS or 2K up to 120 FPS with passthrough of 4K up to 144Hz or Full HDR up to 240Hz. It’s best to use this capture box with a high-end display with VRR, HDR, and high refresh rates while streaming.

Essential live streaming gear
Start streaming using free software to capture your gameplay, but audio and video are half the fun. Here’s a basic list of streaming hardware for beginners.
A powerful PC to stream your gameplay

First and foremost, you need a PC. Your streaming PC delivers your games, face, and audio to Twitch and YouTube for audience viewing. Some people play games on their streaming PC, while others use consoles or handhelds. Many streamers play on a second PC so their stream doesn’t crash if their gaming PC fails. Although expert streamers with an established audience do this, it’s still useful to know how.
TUF gaming laptop
Most beginners stream and game on the same PC, so buy more than your regular target needs. For gaming, consider a desktop or laptop with an Intel Core i5 or AMD Ryzen 5 CPU? Increase your gaming and streaming resources with a Intel Core i7 or Ryzen 7 CPU. More complicated broadcasts with animated backdrops, live community reactions on video, or other interesting components will require more processing power because compositing all those layers live might use up CPU resources.
Encoding and transmitting the finished video requires enough PC resources. The CPU produces the best video, but it requires a lot of resources, thus it’s not used much anymore. Most beginning streamers prefer GPU-encoded video, which is more efficient. Modern NVIDIA GPUs contain NVENC, a die-dedicated component for hardware-accelerated encoding. Choose the correct NVIDIA GPU for gaming from our 40 SUPER series guide or laptop buying guide, and you should be OK.
Finally, if you’re building a streaming PC, use ASUS ROG Maximus, ROG Crosshair, or ROG Strix –E grade boards with plenty of RAM. 32GB is ideal for 2024 streaming PCs, but you may go greater if you multitask. Stock up on gigabytes if you plan to edit your footage later.
Note that the preceding suggestions imply gaming and streaming on one PC. Divide your resources between PCs if you plan to stream and game. (The ROG G22CH is a wonderful tiny PC for this). If you’re streaming console gameplay, you’ll still need a competent CPU and GPU, but it won’t be as powerful as a machine since it won’t be managing the gaming load.
To stream from a console, handheld, or other PC, you’ll need to input its video into your streaming PC. That’s where capture boxes help.
ASUS TUF gaming monitor
First, purchase a capture box with passthrough if you’re gaming on a console and wish to capture and send video to a monitor or TV. This capture device sends video to your streaming programme and display. You want one that passes video at high quality and frame rate.
At least one 16:9 monitor – probably two

Streamers must take specific displays into account. You probably want a 16:9 main monitor. Streaming from an ultrawide display is doable (I’ve done it), but not ideal. Since your stream will likely use a 16:9 aspect ratio, using an ultrawide monitor either cuts off gameplay or forces the game into 16:9 borderless mode, which doesn’t always function. You should probably prefer a 16:9 main display, according to experience. They 32-inch ROG Swift OLED PG32UCDM or 27-inch PG27AQDM are good options. If your budget is tight, consider the 27-inch1440p or 4K ROG Strix XG27ACS or XG27UCS.
You may want two monitors for broadcasting so you can play full-screen on one and use your streaming software and live chat on the other. Choose two of the monitors above if you’re using a desktop, or utilise your laptop display as the secondary monitor in our ultimate laptop setup tutorial.
A headset and microphone

After you have the PC, let’s talk streaming gear. You must first monitor audio and speak to your audience. A USB headset like the ROG Delta S or ROG Delta S Animate is comfy, sounds excellent, and has beautiful lighting that shines on stream.
For in-game chats with friends, use your headset’s built-in mic, but for live broadcasting, use a dedicated mic. Better audio means your viewers will hear you better and your stream will feel more professional. A 25mm condenser capsule, high-pass filter, and quality stand make the ROG Carnyx ideal for this situation, producing warm, clear audio without background noise. The threaded end lets you attach it to a boom arm. In addition, its Aura Sync RGB lighting may match your headset and PC for a complete look.
If you want to reveal your face, you need a camera and audio devices. Your laptop’s built-in webcam will work, but a dedicated webcam like the ROG Eye S will likely give you a better view. If you’re using a desktop, this is a must as your monitor likely doesn’t have a camera. Better lighting improves picture quality (more on this below), and explore with your streaming software’s brightness, contrast, and other settings to get the look you want.
If you have the budget, a mirrorless SLR camera produces sharper images, a professional depth of field effect, and improved low-light performance. However, unlike webcams, most SLR cameras don’t have a direct USB connection for your PC, so you’ll need to use one of the TUF Gaming capture boxes to transfer video to your PC over HDMI.
After gathering your hardware, you’ll need software to record your gaming footage, add a face cam, and broadcast it live. You have several choices. OBS Studio is the most popular, free, and adaptable with many plug-ins. It’s also used for our weekly ROG live streams. Asus TUF Gaming capture boxes are Certified OBS Studio compatible, ensuring optimal performance. Other software is also available. Streamlabs, based on OBS, is like plug-and-play for new users, and XSplit is popular. Follow steps to download, install, and configure.
TUF gaming
Above and beyond
Your trip begins with the aforementioned gear, but it’s not over. Lighting was one topic they didn’t discuss. For novices, a few well-placed lamps can go a long way, but as you experiment, you can add specialised lighting in different forms and prices. Explore your alternatives at your favourite retailer or online merchant.
The same goes for your other gear. As you add scenes, you may desire an easier way to flip between them. While you might use the number pad on your computer, a specialised Stream Deck offers a lot of flexibility with customisable buttons.
You may add more displays, cameras, an audio interface to regulate source volume, and more. Beginning with the essentials above, you’ll learn what you need and what doesn’t fit your streaming style as you broadcast more. Building your setup to grow with you will save you money and time.
How to configure your streaming gear
After gathering your gear, connect it. Mainly, plug your USB microphone and headset into your PC, dim your lights, and have your RGB ready to show off.
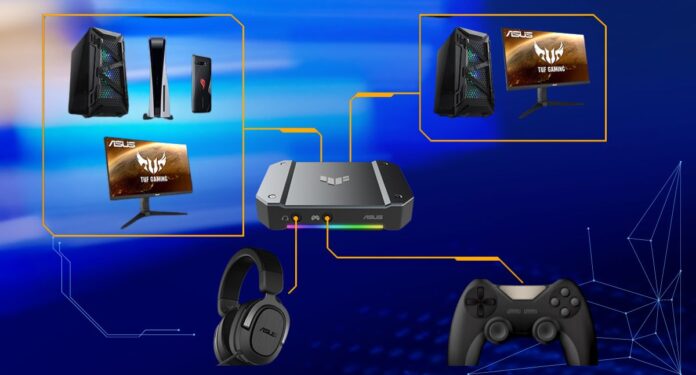
Using a capture device for your camera or a gaming machine requires more connections. Each TUF Gaming Capture Box contains HDMI input, HDMI output, and USB connector. Connect the gaming machine or camera to HDMI In, your primary monitor to HDMI Out, and the USB port to your streaming software-installed PC. This lets your monitor and streaming software receive video simultaneously.
The HDMI In connection on your capture box may require a Mini HDMI to HDMI cable to connect an SLR camera. For your camera model, check the directions to set it up for a Clean HDMI Out output.
Open your streaming software we’ll use OBS and focus on the Scenes and Sources boxes in the bottom left. Add a source to your blank scene by clicking the + symbol under Sources. To add your microphone, click “Audio Input Capture,” and to capture the machine’s display, choose “Display Capture.” Let’s use one of asus TUF Gaming Capture Boxes.
Select your TUF Gaming Capture Box from the Device dropdown in the following box. Most people can utilise the default settings, but you can alter the resolution and FPS or click the Configure Video option to tweak brightness, contrast, hue, and saturation to fine-tune your face cam. When finished, click OK to see the video feed in your scene.
Repeat for other scene sources. TUF Gaming Capture Boxes, USB webcams, and USB microphones may capture your gameplay, face, and voice in a scenario. Adjust the canvas pieces to suit your stream and add overlays and other effects by adding a PNG image as a source. Set your audio levels to keep your voice in the yellow range, not the red. Set your microphone gain and OBS volume to your liking. Before streaming, record a few times to get the video and audio right.
Create additional streaming scenes after finishing your scene. Some streamers start with their facial cam expanded, then switch to their gameplay. Set hotkeys for each scene under File > Settings > Hotkeys to flip between them throughout your broadcast.
Finally, connect Twitch, YouTube, and other streaming accounts to OBS under File > Settings > Stream. Most of the default settings will work for your first stream, but for better video quality, go to the Output tab and set your bitrate higher, such as 6500kbps, depending on your internet connection speed and streaming service’s maximum bitrate. So you may need to research and experiment to discover the perfect value.
As you gain more experienced streaming, you can add sources, scenes, or Docks to your window (such the Stats dock to see if your stream is dropping frames or the Chat dock to see your OBS chat). As you find your footing, experiment every streamer is different, but once you get settled, you’ll be more tech-savvy. Enjoy the ride!


